There is no shortage of pests that love to feed on cannabis plants.
Pests are everywhere in nature and can find their way to plants indoors in many ways; e.g. through open windows/ventilation intakes, contaminated lawn and garden equipment or via one’s own clothes or pets. It is important to be able to identify them early on, otherwise they can do a lot of damage.
Here are some of the most common Danish pests:
Contents:
Spider mite
Aphids
Mourning Mite
Trips
Mellus
Scale insect
Caterpillars, larvae etc.
Snails
Summary
Spider mite (Tetranychus urticae)
These are some of the most common, notorious – and feared – pests in the cannabis world. They are found outside where they die in winter, but if introduced to an indoor environment they can unfortunately live and reproduce all year round. One way they often come is via houseplants bought in supermarkets or from nurseries. It is therefore a good idea to check them before bringing them home.
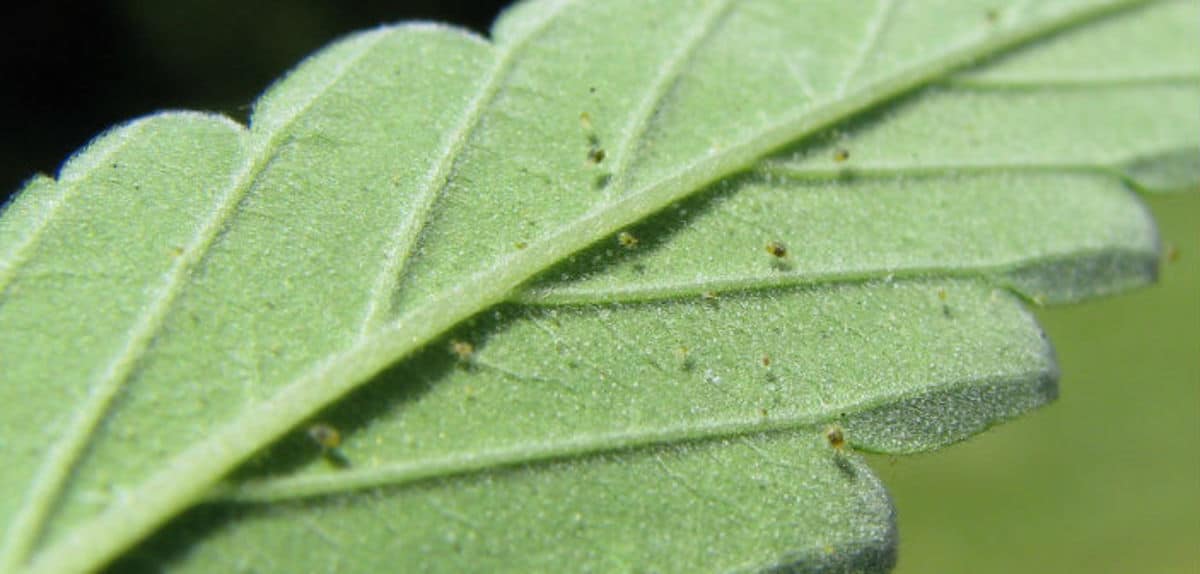
Spider mites are tiny spiders that are incredibly difficult to see precisely because of their size and the fact that they primarily reside on the underside of leaves.
You have to be very careful (or lucky) to detect them before you see symptoms.
By far the most common is that you first see signs that something is wrong with the plant: white or yellow dots appear on the leaves, which gradually grow larger and larger. This can easily be mistaken at first as a fertiliser-related problem, but the spots are tissue damage caused by the spider mites, which sit on the underside of the leaves and suck plant sap.
When the attack is advanced, the web of the midge will become more and more extensive and visible.
How to fight spider mites?
There are many products on the market for this, but a super good pesticide that is also fully organic is Plant Vitality Plus from Dutch B.A.C. .
.
A solution of this in the ratio 1:20 is sprayed with atomizer bottle on the whole plant (especially important is the underside of the leaves). Also the surface of the groomed area is sprayed to get at the eggs. The product is photosensitive, which means that the application should be done during the plant’s night period; preferably just after lights out, so it has all night to work. The spray kills the spider mites as well as their eggs after the first time and the treatment is repeated after 5 days.
However, once you have them, spider mites are difficult to get rid of completely and tend to reappear after a few weeks or months. Temperatures below 15°C significantly lower their reproduction rate, which can be a way to keep them under control (but is not ideal for the cannabis bite itself). In extreme cases, it may be necessary to disinfect the entire room and all equipment, pots, trays, etc., wait a few weeks or a month, and then start over with new plants and grow media. It’s a huge job, so there are also those who choose to live with the spider mites and fight them continuously. There are examples that they can disappear after 1 year with consistent control.
Biological control
A biological control method is the use of beneficial animals, which can be purchased online (e.g.
utilityanimal.com
and
bioplant.dk
). The spider mite (Phytoseiulus persimilis) is a mischievous small predator specialising in spider mites. If you have had problems with spider mites and expect them to return soon, the predatory mites can be released preventively. Be aware, however, that these die relatively quickly from starvation if their food source, the spider mites, has not hatched yet.
Aphids (Aphidoidea)
Aphids are most often a problem outdoors and in greenhouses, but – like spider mites – can come indoors via clothing, pets, an open window/vent or garden tools.
A few aphids are no problem (and naturally outdoors), but as they reproduce at an uncanny rate they are a potential disaster as large colonies can quickly kill off an otherwise healthy and strong cannabis plant. Furthermore, aphid infestations can have accompanying consequences in terms of infection and mould infestation of the plant.
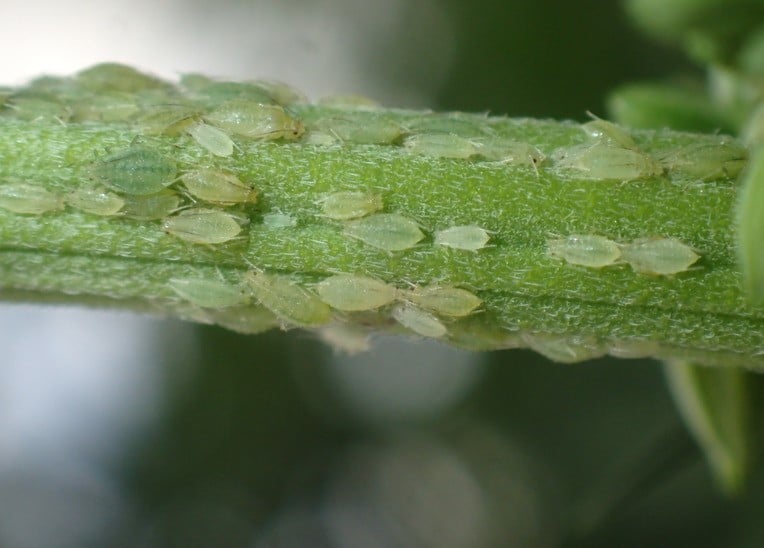
There are over 400 species of aphids in Denmark. They are typically 1-3 mm and reside mainly on the underside of leaves, where they suck plant sap. They give birth to live young and can therefore grow rapidly in numbers.
Appearance-wise most probably know the aphid; they are the size of a pinhead and are usually green, but they also come in white, black or almost pink varieties.
They may be confused with mourning mosquitoes (Sciaridae), as they may have wings. Aphids can live on the whole plant; on top shoots, branches and leaves. Their green variety can be hard to spot, especially as they like to stay slightly hidden on the plant; often away from direct light sources.
The aphids live by sucking plant sap and secrete a thick, sticky substance called “honeydew”. When it dries, the area becomes highly susceptible to the development of various fungal species, including black mould. This can quickly spread to the whole plant. The sweet scent of honeydew is also a magnet for ants. They will flock in large numbers and protect the aphids from their natural enemies, which is obviously bad news for the plant. In addition, the honeydew blocks parts of the leaves, making photosynthesis impossible.
A cannabis under severe attack will have curled and deformed leaves, which wilt and/or yellow due to stress and cell damage. This severely hampers plant growth.
How to control aphids?
First of all, it is always a good idea to use sticky traps/insect paper indoors. This can stop flying aphids from reaching the plant, as well as giving an early indication of impending problems.
Both indoors and outdoors, many people spray with neem oil, which is organic and effective – not only against aphids – but many other pests. However, be aware that neem oil should only be used in the growth phase or early flowering as its strong fragrance can spoil the taste and aroma of your crops.
We can also recommend
Insect-free spruce
from Dutch ECOstyle, which is a ready-mixed solution consisting of a natural extract of chrysanthemum. In our experience, it is effective and, most importantly, approved for edible crops as well as for use in organic fields, and can therefore be used right up to harvest time. The solution is sprayed directly from the spray bottle onto the entire plant (it is important to cover the underside of the leaves as well), after which the aphids die after a short time. Avoid spraying during the day or in temperatures above 25 C° for best effect. If the attack is particularly bad, the treatment can be repeated after 7 days.
Biological control
A biological control method is the use of beneficial animals, which can be purchased online (e.g.
utilityanimal.com
and
bioplant.dk
). Ladybirds (Adalia bipunctata) and goldeneyes (Chrysopidae) are both among the aphids’ main natural enemies and therefore an excellent choice. They can also be used preventively, for example a week after spraying, to give a harsh welcome to any survivors or new arrivals.
Mudpuppies (Sciaridae)
Moths are small flies that are elongated and black. They multiply in the greenhouse, but can also be found in hydroponic systems without greenhouses such as NFT systems. In English they are called “fungus gnats” because they feed on dead and fungus-infected organic matter.
They occur worldwide in all climates (even Antarctica). But their damage is clearly greatest indoors, where they often enter with other potted houseplants or contaminated groomed soil.
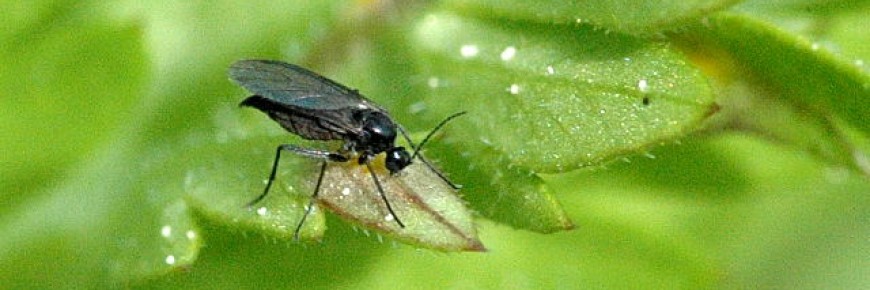
Adult mourning chicks are about 3 mm long and can be seen flying up when the plant is disturbed. The larval stage of the mourning mosquito is a serious threat as they gnaw on plant roots and reduce water and nutrient uptake.
Moths are often attracted to the top shoots, which they can destroy by getting caught in the sticky crystals. They lay their eggs in the top of the groom, if this is moist and warm. The larvae are the major pest in this respect. They nibble at the roots – mainly the small delicate hair roots (“feeder roots” in English). The plant’s ability to absorb water and nutrients is impaired and its growth is stunted, or in the worst case, comes to a complete standstill. Furthermore, the infestation can cause fungal infection of the root zone and root rot, which can be disastrous.
They live mainly in the lower parts of the plant, and fly up from the pot when the plant is disturbed. Their offspring can often be seen in the drainage/excess water when the pot is watered and they are thereby flushed out.
Other serious indicators of mourning midge are bleaching of the plant’s leaves, brown leaf tips and development of dark spots on the leaves. The leaves may also turn yellow, start to droop and/or curl. The effect on the whole plant can include serious stunting of growth and leaves suddenly starting to wither and fall off in greater numbers.
How to prevent mourning mosquitoes?
As with other flying insects, it is always a good idea to be ahead of any problems by hanging sticky insect traps/fly paper in and around the growing area. This can first catch the mourning mosquito and thereby prevent them from laying eggs at the plants, and if it fails, secondly give you an indication of a potential infestation early on.
As mourning chiggers, besides roots, eat dead plant material, it is therefore important to make sure to pick up withered and dead leaves regularly. As their preferred environment is one with high humidity, and with lots of algae and high nitrogen content, it is important not to overwater or overfertilise (besides neither being good in the first place). To prevent the mourning mosquitoes from laying eggs in the groomed area, it is advisable to cover it with plastic or cloth.
How do you control mourning mosquitoes?
A commonly used control method is irrigation with a solution of neem oil directly into the soil. 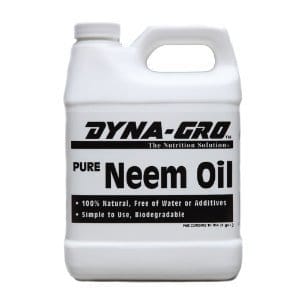 It effectively kills the larvae and is a 100% organic substance that does not harm the plant or beneficial microbial cultures. The treatment can be repeated after about 7 days.
The use of beneficial animals is another effective solution (
utilityanimal.com
or
bioplant.dk
). One of the mosquito’s main natural enemies is the nematode (a nearly microscopic worm), which fights the larvae in the soil. You buy them in a bag, which you pour into water and water with. Subsequently, the nematodes themselves “swim” around the pot and infect the larvae, killing them, and from their bodies the nematodes reproduce themselves. Another effective beneficial is Hypoaspis soil predator, which in addition to mourning mosquitoes also controls thrips etc.
The methods only control the mourning fly in the larval stage, which is the critical point, so it will take some weeks before you can see the difference in the number of flying adult mourning flies. If you have not already done so, it is therefore a super good idea to set up sticky traps/insect paper so that the adults are also controlled.
Trips (Thysanoptera)
Trips – commonly known as thunderflies – are a common cannabis pest. They can be a major problem, especially in the early life of the plant, as they significantly inhibit growth/yield if the plant is not given time to recover.
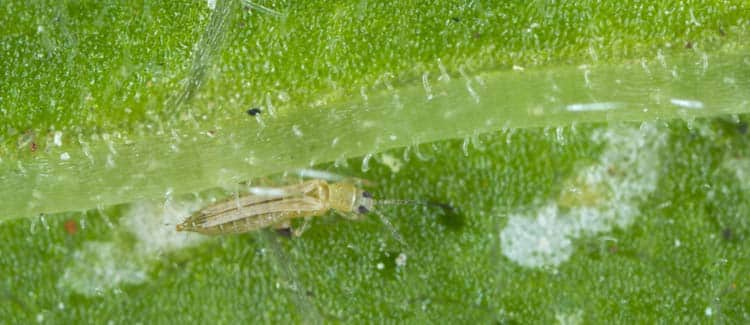
Trips come in varieties with wings and as small caterpillars. They can be black, yellow and brown (larvae often yellowish). They are 1-2 mm in length and therefore difficult to see with the naked eye.
They can enter through open windows, other potted plants or via clothing and pets. Outdoors they start to appear in spring, but if they come indoors they can survive here all year round. Even if you’re careful, they can seem almost impossible to keep out, and most people will probably experience them at some point.
They thrive in warm environments and are therefore usually a serious problem indoors or in greenhouses.
They are therefore most often detected by the plant showing symptoms.
The classic first sign is small silvery “snail trails” or dots on the leaves. The thrips prefer to stay on the underside of the leaves, where they rasp away (causing cell damage) and also lay their eggs. The concentration of them is highest on the lower parts of the plant, so this is the obvious place to check periodically.
More severe symptoms, when the infestation is more advanced, are brown and yellow irregular patches on the leaves and the plant starts to lose leaves.
How to fight thrips?
As with aphids, we recommend Insektfri Spruzit from Dutch ECOstyle. It is a ready-mixed product consisting of a natural extract of the chrysanthemum plant. It is approved for edible crops as well as use on organic land. The solution is sprayed directly from the spray bottle onto the entire plant (it is important to cover the underside of the leaves as well). Then the thrips die shortly after. Avoid spraying during the day or in temperatures above 25 C° for best effect. If the attack is particularly bad, the treatment can be repeated after 7 days.
Biological control
For beneficials, Orius predatory ticks (Orius majusculus) are highly recommended. They take both adult thrips and larvae. For extra efficiency, Orius can often be usefully combined with Tripsrovmids (Amblyseuis cucumeris), which only go after the larvae, as they each thrive in slightly different conditions, and can therefore complement and help each other.
Mellus (Trialeurodes vaporariorum & Bemisia tabaci)
Also known as “whiteflies”. There are mainly 2 species of it in Denmark, which are potentially problematic indoors and in greenhouses, but they are very similar, so we will treat them the same here. In the open, mellus are rarely a problem as there are plenty of animals to eat them and the environment is not nearly as favourable as indoors.
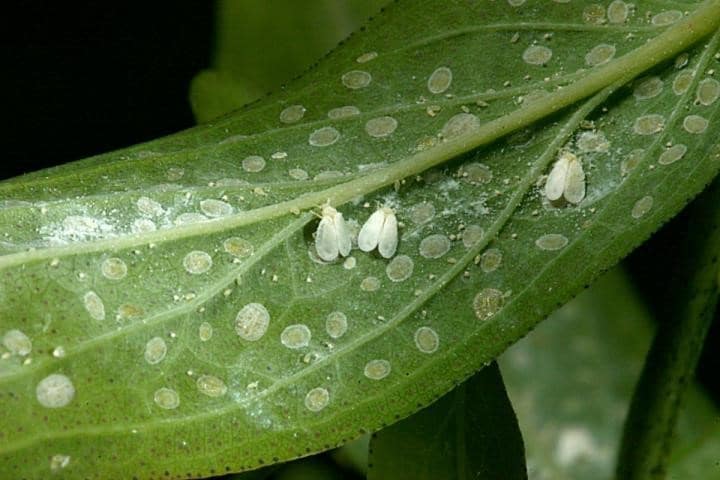
Mellus have wings and resemble moths in appearance. The adults are 1.5-2 mm in length, and can be seen flying around when the plant is disturbed. Like the mourning mosquito, it is the larvae that cause the real damage.
As the name “louse” suggests, they lay louse-like eggs that stick to the plant. Eggs are funnel-shaped and typically grey or yellowish. Mellus larvae attack cannabis in the same way as aphids and spider mites, by sucking plant sap from the underside of leaves.
It is quite easy to detect adult mellus, especially by shaking the plant, as you can then see them fly up.
The first symptom of mellus to look out for is small white spots on the upper surface of the leaves. This is the result of the larvae sucking the juice from the underside of the leaves.
Like aphids, midges secrete “honeydew”, which inhibits plant growth and, among other things, provides a breeding ground for black mould, which can quickly spread and destroy the entire plant. Furthermore, honeydew attracts ants, which help protect the mellus from their natural enemies, which is far from ideal.
How to fight mellus?
Spraying with insecticide, intended for edible foods, kills both eggs, larvae and adult mites after the first time.
There are many brands to choose from, but ECOstyle Insect-Free Spruzit, which can be bought in all DIY stores, has a good track record. They are effective, approved for use on organic land and easy to use as ready-mixed spray bottles. They are sprayed directly on the whole plant (it is important to cover the underside of the leaves as well). Avoid spraying during the day or in temperatures above 25 C° for best effect. If the plant is severely affected, the treatment can be repeated after 7 days.
A solution of neem oil (follow the instructions on the packet), which is 100% organic, is effective. The great advantage of neem oil is that it works systemically. This means that after some treatments, the plant absorbs the oil and thereby kills future pests that eat/suck from it. In this context, it is important to note that neem should only be sprayed during the vegetative phase and early flowering (avoiding hitting the top shoots), as it is an essential oil that can give the cannabis a semi-slick taste and spoil the aroma.
Biological control
A biological control method is the beneficial insect, the Mellus wasp (Encarsia formosa). They are effective at the beginning of an infestation, but in more advanced cases they cannot keep up with the reproduction rate of the mellus. Control must therefore be carried out in combination with one of the above methods. Mellus wasps are bought as pupae, which are placed in the room and after a week they hatch into small wasps, which fly out and hunt the mellus larvae. Once found, the parasitic wasp lays its eggs in the larva, killing it. However, it only lays eggs in the last stage of the mellus larvae, which means that the adult mellus are still flying around and laying eggs. Sticky traps/insect paper cannot be used to catch the waxy ones, as the parasitic wasps also go into them.
For these reasons, for example, it may be a good practice to use neem oil or insect spray as soon as possible to dramatically reduce numbers, and then release the parasitic wasp 7 days later rather than spraying with the same solution again. In this way, any survivors are hunted down continuously, and at the same time act as a deterrent against new invading mellus.
Scale insects (Coccus hesperidum, C. Hesperidum and Pulvinaria sp.)
There are a myriad of species, but the above are the most common in Denmark.
They have many natural enemies outdoors, which makes them mainly a problem indoors where they are protected and can breed unhindered. Males have wings but live only a short time, so it is usually adult females or eggs that are introduced indoors via garden tools, clothing and/or domestic animals.
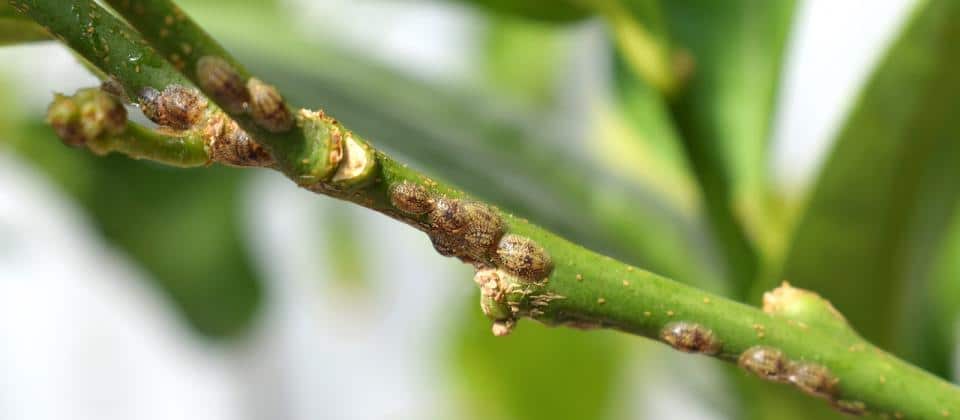
Shield lice are, as the name suggests, covered by a shield. There are a myriad of species and some have a floury wax layer instead of a solid shield. What they have in common, however, is that they are well protected and difficult to control.
Once the scale insect has found a suitable host plant (they have a wide appetite and love cannabis), it establishes itself on it, then forms a protective shield and remains immobile for the rest of its life. Under the shield it lays eggs while sucking plant sap. The young larval stages of the scale insect have legs, and these are what spread the species.
They like to settle on both trunks and leaves. Scale insect suckering weakens plant resistance, inhibits/stopps growth and results in reduced yields at harvest time.
Yellowing of the leaves is the first sign of an infestation and in severe cases the cannabis plant will eventually wither and die.
Another symptom is the so-called “honeydew” on the leaves. This substance is secreted by the scale insects and is an ideal breeding ground for various infections such as black mould, which can quickly spread and cause the whole plant to succumb. In addition, honeydew can attract ants, which is also not optimal, as these can help spread the species. Last but not least, the honeydew physically blocks the leaves so photosynthesis goes down drastically which of course inhibits growth further.
Prevention of scale insects
Outdoors they are usually not an imminent threat because predators naturally limit them, but they can be – especially in a greenhouse. Laverne can move, but is still pretty bad at it. Rugged terrain is a big barrier for them. Uneven soil and pebbles around the plants can prevent them from reaching them. Another trick is to plant, for example, rose bushes around them, which will stop them and distract them from moving on.
Indoors, check newly purchased pot plants for vermin. Once inside the four walls of your house, they can easily spread to your cannabis plants. Of course, it’s also important to keep outdoor and indoor garden tools separate. Changing clothes if you’ve done outdoor gardening is also a good precaution before entering your indoor garden.
How are scale insects controlled?
The moment you notice that scale insects have established themselves, you should isolate the plant(s) concerned immediately so that the infection does not spread further.
You can then try spraying with various insecticides (Insektfri Spruzit). However, their shield protects the adult egg-laying females to an uncannily effective degree. You can only expect it to kill nymphs and males. It takes a combined effort to eradicate scale insects. You should inspect the plants daily and see when many new larval mites hatch. Then you can spray them to kill them. In parallel with this process, the adult scale insects can be “mechanically removed” i.e. scraped off the plant.
Neem oil is quite effective against scale insects in all stadia even the females with shields. The product is mixed with water (follow the package instructions) and sprayed with a spray bottle on the entire plant. Neem oil works systemically, which means that it is absorbed by the plant and bypasses the scales’ shells, making the plant’s sap, its food source, toxic to it. Neem oil, however, is only suitable for plants in the vegetative stage and the first few weeks of flowering. The oil’s strong scent can spoil the taste and aroma of your crops.
Biological control
Beneficial animals can also be used and the ladybird is suitable here. However, care must be taken to ensure that the area in which they are used is more or less hermetically sealed, otherwise they tend to fly away quickly.
Caterpillars and various larvae
Outdoors, you may encounter caterpillars and other grubs with voracious appetites.
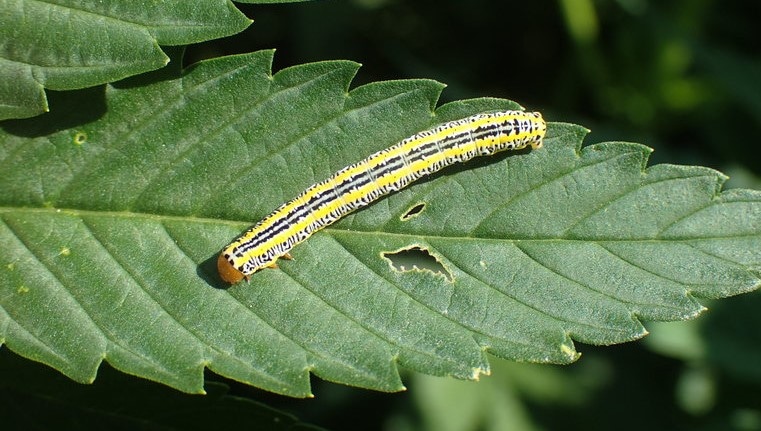
Caterpillars of various butterflies and moths hatch as early as May-June and can cause major damage to crops during the summer.
A group of large cabbage butterfly larvae can chew up extraordinarily large portions in record time and the result can be fatal even for well-established, mature cannabis plants. The large open wounds on the plant can cause a lot of problems, such as infections and attracting smaller sap-sucking pests to the plant, all of which inhibit cannabis growth.
The large species of cabbage worm is clearly the worst, firstly because it is quite large (about 4 cm long) and voracious, and secondly because there are often several of them on the same plant. Both things make them – fortunately, but paradoxically – also easier to spot.
First signs of larvae are chewed leaves, stems and top shoots. The newly hatched larvae consume the cannabis bite in a superficial and sporadic manner. The older and larger caterpillars, on the other hand, gnaw holes in the leaves and do not hesitate to take the leaf stalks with them. The snail infestation can be confused with slug infestation, however, there are often slime marks on the leaves.
Another obvious sign is patches of wet red-brown or black balls on the leaves, which are the droppings of the lava. If you are in doubt whether the nibble comes from a snail or a caterpillar, look for the caterpillar’s droppings and snail slime.
Prevention of caterpillars and various larvae
If you can, it can be a huge advantage to put insect netting around your outdoor plants or in your greenhouse windows. This prevents butterflies, moths, etc. from laying eggs in plants. The net must be completely sealed on all sides, as they will find any holes.
It is always a good idea to check your plants on a daily basis (also under the leaves). If eggs are seen, they must of course be removed before they hatch.
A preventive spray with neem oil during the vegetative period can also deter insects from laying their eggs there.
How to fight caterpillars and various larvae?
 You can do it “au natural” and remove them manually. This assumes that you have a manageable number of plants and that the infestation is not too extensive.
You can spray with a ready-to-use insecticide such as ECOstyle Insect Free Spruzit, which kills larvae on contact. Both are made for use on edible crops and are approved for use on organic land.
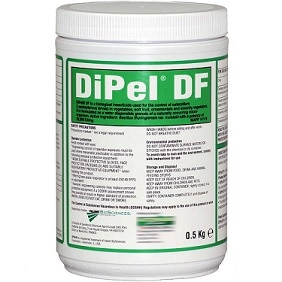
Another option is to use the bacterial preparation DiPel DF, which is a biological insecticide targeting butterfly, moth and moth larvae. The solution is sprayed on the plant, after which the larvae ingest it. When this happens, they stop feeding and die after a few days. If new larvae hatch, repeat the treatment after 10-14 days. Read the instructions on the product carefully (e.g. it is important that the minimum temperature is 15 °C.
Biological control
If you grow in an enclosed greenhouse and put insect nets over the windows, you can introduce beneficial insects to regulate the population. Beneficial animals for butterfly and moth larvae include. the egg-laying wasp (Trichogramma sp.) and the turnip, Podisus maculiventris.
Snails
There are numerous species of snails in Denmark, which are traditionally divided into two groups: house snails and nudibranchs. The former are generally harmless – unless they occur in large numbers, which rarely happens – while the latter, the nudibranchs, are typically the ones that cause major problems.
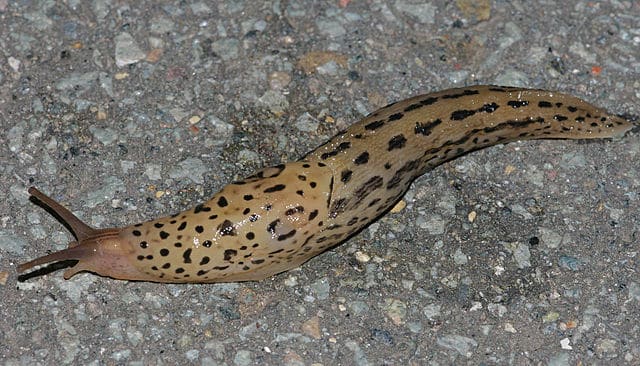
Agersnail (Deroceras reticulatum)
The two main slug threats to the cannabis plant in Denmark are the Iberian Forest Slug (Arion lusitanicus) – aka the dreaded killer slug – and the chaff slug (Deroceras reticulatum). They are considered the most destructive for outdoor growers, as they have a voracious appetite and often occur in large numbers in the same place.
The killer snail grows up to 15 cm long and can vary in colour from red/brown to dark. It can be difficult to identify as it is easy to confuse with other nudibranchs. If there are many snails together with the above characteristics, they are most likely killer snails.
The chafer grows up to 4 cm long and comes in light and dark grey varieties. They are exclusively nocturnal, so they can be difficult to find during the day as they hide.
The prevalence of snails varies depending on where you are in the country. Some will never experience problems, while for others it will be a recurring issue. As a rule of thumb, the more lime in the soil, the more slugs there are.
First signs of slugs are often gnawing marks in crops accompanied by slime trails on leaves or on the soil around plants. The holes are irregular in shape and typically evenly spaced and target the softest parts of the plant. Although the damage may initially be thought to be caused by a single “runaway” snail, it can quickly develop into a large number of snails, after which the situation can quickly become critical.
If there are rubbing marks and you can’t see slime, check for black balls and red/brown blotches on and around the plant. These are droppings which indicate that they are not snails but butterfly larvae.
Prevention of snails
There are several ways to reduce the risk and/or prevent slugs from reaching your plants.
First of all, the area can be made unattractive by removing the snails’ favourite haunts. They love moisture and shade such as dense ground cover, plants with low hanging leaves and especially compost heaps.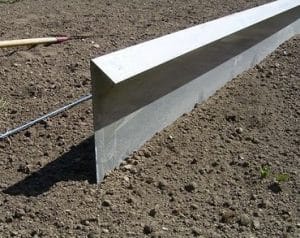
You can also make various barriers, such as snail and copper fences.
Slug fences are vertical barriers (often made of thin sheet (metal)) with edges of 6 cm and bent at an angle of about 50 degrees. Snails will not be able to get over the edge without falling down. The fence must be 20 cm above the ground and 10 cm below the ground.
Another example is copper fencing, which is however significantly more expensive due to the price of materials. The copper fence should not have any curved edges or similar, as it works by having a natural electrical charge that acts like a mini shock fence on the slugs.
How are slugs controlled?
Manual collection of the slugs is one of the most important methods of control. The snails come out at the end of the day, so it’s easiest to find them here. They are collected in a bucket and either released far from the garden or killed (NB. the killer snail is considered an invasive species, so it should always be killed).
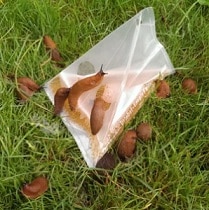 In addition to manual collection, it is a good idea to set up slug traps. These can be bought in most DIY stores, nurseries and larger supermarkets. However, you can easily make them yourself, as it is essentially just a container buried in the ground with a bait. Search Google for snail traps or beer traps and there are many examples.
In addition to collecting snails, look for their eggs. They are 3-4 mm in diameter, completely white and often lie in clusters in damp and shady places, e.g. just below the soil surface or withered leaves.
Slug pellets are also available, such as Ferramol, which is approved by the Danish EPA for areas with edible vegetables. However, we would not immediately recommend using it. Although it is supposed to be harmless to hedgehogs, frogs, toads, etc., it is suspected by many not to be completely harmless after all. Last but not least, snail poison is not a “quick-fix” against the big nudibranchs, but mainly harms the less harmful/friendly small house-bearing snails (and they are a pity).
Biological control
Another option is to lure the snail’s natural enemies into the garden. This can be done by creating hiding places and offering them food. Hedgehogs, birds, frogs and toads are all effective at keeping slugs at bay and do no harm to plants.
Summary
Whatever the pest, it’s important to watch for symptoms and deal with them early on. If pests are only detected when they are well established, they are more difficult to control. The risk of damage to crops is therefore much greater.
Daily monitoring of plants and prevention is always better than control.
In an indoor controlled environment, pests are consequently less likely. But once the animals get inside, the growing conditions are often ideal, so the problem can grow huge in a short time. Indoors they can also thrive all year round, while outdoors they would die after the season.
The most important thing you can do indoors to minimise the risk of pests is to maintain proper humidity and temperature, good air circulation and remove dead biomass.
Incoming air (intake) should be filtered through a dedicated insect/pollen filter; and open windows should be fitted with insect screens.
It is often easy to confuse a pest infestation with a fertiliser-related problem, as the animals can be hard to find and the symptoms can be similar.
However, by reading up on pests and learning about over- and under-fertilisation, you can quickly find the source of the problem. As with anything, it gets easier with experience, and don’t worry: everyone, indoors and out – no matter how many precautions you take – will get pests sooner or later. The most important thing is to minimise the risk and detect and act early.


